
Step-By-Step Guide: How To Draw An Orchid
Drawing an orchid can seem daunting, but with the right techniques, it can be a rewarding experience. Start by sketching the basic shapes and then focus on the intricate details that make orchids unique. Pay attention to the delicate curves of the petals and the graceful stems. Let’s dive into the step-by-step process of how to draw an orchid and bring out its beauty on paper.

How to Draw an Orchid: A Step-by-Step Guide for Kids
Welcome, young artists! Have you ever looked at the delicate beauty of an orchid and wished you could capture it on paper? Well, today is your lucky day! In this fun and informative guide, we will take you through the exciting journey of drawing your very own orchid. So, grab your pencils and let’s get started!
Materials You Will Need
Before we dive into the drawing process, let’s make sure you have all the necessary materials at hand:
- Pencil
- Eraser
- Drawing paper
- Coloring tools (optional)
Once you have all your supplies ready, find a comfortable and well-lit space where you can let your creativity flow!
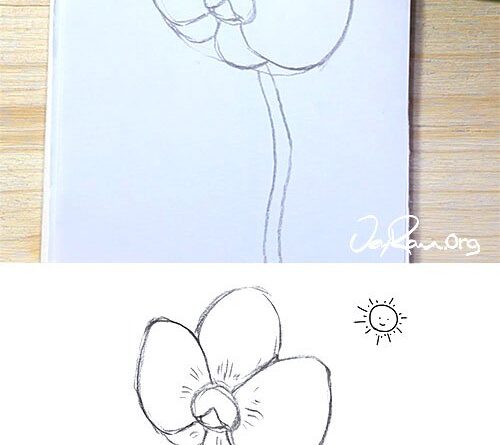
Step 1: Sketching the Basic Shape
To start drawing an orchid, you need to sketch the basic shapes that form its structure. Begin by drawing a slightly curved line for the stem of the orchid. Then, add a teardrop shape at the top of the stem for the main petal of the flower.
Next, draw two smaller teardrop shapes on either side of the main petal to represent the side petals. Remember, orchids come in various shapes and sizes, so feel free to add your unique touch to the petals!
Step 2: Adding Details to the Petals
Now that you have the basic outline of the orchid flower, it’s time to add some details to make it more realistic. Start by drawing gentle curves along the edges of the petals to give them a soft, flowing appearance.
Orchid petals often have intricate patterns and lines. You can create these details by drawing thin lines or dots on the surface of each petal. Take your time and enjoy the process of adding these beautiful details to your drawing!
Step 3: Drawing the Leaves
Orchid plants have long, slender leaves that complement the beauty of their flowers. To draw the leaves, sketch elongated ovals on each side of the stem. Make sure the leaves are slightly curved to give them a natural look.
Once you have the basic shape of the leaves, add veins by drawing thin lines running from the center of each leaf to the outer edges. This will add texture and realism to your orchid drawing.
Step 4: Adding Color (Optional)
Now comes the fun part – adding color to your orchid drawing! Orchids come in a wide range of colors, from vibrant purples and pinks to delicate whites and yellows. Use your favorite coloring tools to bring your orchid to life!
Feel free to experiment with different color combinations and shading techniques to make your orchid look even more stunning. Remember, there are no right or wrong colors when it comes to art – let your imagination soar!
Step 5: Final Touches and Reflection
Once you have finished coloring your orchid drawing, take a step back and admire your masterpiece. Are there any final touches or details you would like to add? Feel free to make any adjustments to ensure your drawing reflects your creativity and style.
Drawing an orchid is not just about replicating its image; it’s also about expressing your artistic spirit and imagination. So, enjoy the process and have fun creating your very own orchid artwork!
Congratulations, young artists! You have successfully learned how to draw an orchid from start to finish. Remember, practice makes perfect, so don’t be afraid to keep honing your drawing skills and experimenting with different techniques.
Art is a wonderful way to express yourself and explore the beauty of the world around you. So, keep drawing, keep creating, and most importantly, keep dreaming big! Who knows, maybe one day you’ll be painting the most magnificent orchids in the world!
Happy drawing!
Thank you for following along with our “How to Draw an Orchid” guide. We hope you had a blast unleashing your creativity and bringing the beauty of orchids to life on paper!
How to Draw an Orchid Flower Easy
Frequently Asked Questions
What materials do I need to draw an orchid?
To draw an orchid, you will need paper, pencils or colored pencils, an eraser, and reference pictures of orchids to guide you in capturing their unique features and shapes.
How can I begin sketching an orchid for my drawing?
To start sketching an orchid, lightly outline the basic shape of the flower and its petals. Pay attention to the details such as the symmetry of the petals and the arrangement of the orchid’s unique features.
What are some tips to add color to my orchid drawing?
When adding color to your orchid drawing, observe the natural colors of orchids and use colored pencils or markers to carefully layer and blend shades to achieve a realistic look. Start with lighter colors and gradually build up to darker tones for depth.
How can I make my orchid drawing look more lifelike and detailed?
To make your orchid drawing more lifelike and detailed, focus on adding shading and highlighting to create depth and dimension. Pay close attention to light sources and shadows to enhance the realism of your artwork.
Final Thoughts
In conclusion, drawing an orchid is a rewarding experience that allows you to unleash your creativity while capturing the beauty of nature. Remember to start with the basic shape of the flower and then add intricate details such as the petals and leaves. Practice sketching different orchid varieties to improve your technique. By following these steps and observing real orchids for inspiration, you can master the art of drawing this delicate flower. Enjoy the process and let your imagination guide you in creating stunning orchid illustrations.